| Ok, so let me start by saying there must be hundreds of bait-rolling anglers in our wonderful world of fishing, the majority have probably got bait making and rolling down to a fine art and could therefore offer a vast amount of tips and tricks to help finesse the task of making boilies. I on the other hand have just started to make my own and would like to think this feature would help inspire others in tackling the same task. I first started thinking about making my own boilies on the back of responses fed in from the Boilie Baits or Blatant Bullshit! thread. This was my very own quest in order to break down the thinking of talented anglers and of course their views to bait methodology to help improve my own. My intention was to get under the skin of bait and at the same time kick-start my own thought process. This article is about my ‘trial and error’ regarding boilie making, however if you wish to investigate the methodology of bait, etc, then please visit the thread above as you’ll find it offers up a great read! Trial and Error I was having some great results last year on Red Cherry flavoured boilies – when some were blanking, I was catching. But for love nor money I couldn’t get my hands on these baits as my local tackle shop decided not to stock them anymore. Hence my venture into making my own.
The Base Mix First stop, finding the right base mix. There are many to choose from and although seemingly expensive for a 10 kilo bucket, in the long run this will surely save me money. I opted for a birdseed make-up with a sweet flavour. I deliberately won’t give you the name of the manufacturer as I believe the best way to choose your own is to get your nose stuck in the pot until you find the one that suits you and of course your confidence. Giving you details can only delay kick-starting your very own thinking process. Flavouring Second stop, getting my flavouring. I managed to get a bottle of Cherry Brandy Liqueur for £ 15 from Sainsbury’s. Working out the measures was a fascinating ‘one for the fish’ and ‘two for me’ scenario. Unfortunately it wasn’t until the next day that I discovered you can buy a concentrated bottle of Cherry-like flavouring for just £ 1.20. Although I learned the hard way, it’s fair to say that I certainly enjoyed the lesson! (hick-up – oops!). Colouring Colouring is also a funny old thing to consider. Next time you’re out looking at the most beautiful coloured boilies available in your local tackle shop, spare a thought as to how much colour these little puppies will lose within the first 15 minutes of being in the water. On the first few batches of bait I discovered that although I’d put in a fair share of colouring, on boiling my baits I found they were coming out the colour of raw sausage meat. Although colouring may not be important to you, I was adamant I wanted the right colour, or at least the right colour after being in water (but that’s just me). Big Rik was only a call away Now although I had Big Rik (‘Carp Angler’) on hand who was receiving about 500 calls an hour from me over the weekend, I still managed to cock it up at first. Unfortunately, all too confidently I thought I would get it right first time and decided to batch up 5lb’s worth only to find out I’d missed the spot by miles. So my first piece of advice is to start with small batches of no more than 1lb (maximum) and note down absolutely everything as you go.
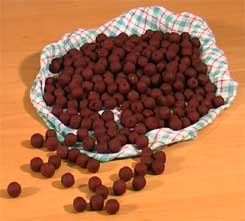
The First Test And now for my first test. I broke a piece off and rolled it into a ball then placed into a glass of cold water. Sat back and waited for fifteen minutes. Happy with the fact that the bait lost 25% colouring but still maintained a good rich maroon colour (my personal choice) I continued. Rolling I then set about the task of rolling my baits. My advice is don’t do them by hand, instead buy yourself a cheap and cheerful bait rolling table, and make sure you get the size you require for the baits you wish to roll. This is a serious case of trial and error, but don’t give up as eventually you’ll find the right texture to make your rolling near perfect. And Now For The Pop-ups Once I was happy with my newly formed round baits I put them to one side and commenced the task of pop-ups. Again taking advice, I decided to go with cork balls. Although extremely expensive, I moulded my paste around the cork ball giving me an approximate 2mm coating. Once again I tested these in cold water. (if anyone knows where I can get my hands on cheap cork balls then please give me a shout!) On The Boil Now the fun begins. This is the job satisfaction part! (or at least it should be). I filled up a pan of water and brought it to boil. I added a couple of drops of red colouring as I’d been advised that you lose much colouring when boiling baits with normal tap water and I certainly wished for my baits to retain most of their original colour.
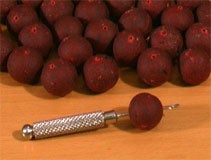
Five minutes later I moved them onto a clean dry towel and left for 48 hours to harden whilst occasionally turning them. Pre-drilled Baits Just for the record, my own experiences have taught me that if you put baits in dips and leave for a few days, the bait itself will retain it’s colour even after being in water for a while, it also toughens the bait up. So I decided to drill my pop-up baits before I soaked them in my dip to make life easier on the bank. Happy With The End Result The end result for me, I’m pleased to say, is a bait I’m extremely happy with, smelling to suit my own choice and retaining my desired colour. Add this to the fact that I’ve made them myself, I can assure you that the pleasantries of landing a fish on them will be ten times more enjoyable for me. Anyways, I hope this feature helps you in clarifying the pitfalls if you decide to make your own boilies. I’m off to find another liqueur to accidentally pour down my neck. |
Welcome!Log into your account


