The basic river float fishing method is to use a trotting float. The main trotting float types are balsa floats, stick floats, chubbers and Avon floats. Stick floats are covered in a future Stick Float Rig article.
The other three float types have their buoyancy at the top of the float with a slim tip. They should be attached at both ends using silicone rubber float tube. Their design makes them stable in moving water, and because they are attached at both ends it is possible slow the progress of the float through the swim.
Choosing a float
Balsas and chubbers are similar in shape being a cigar shape. Chubbers are usually made of clear hollow plastic and useful when you want to fish very boily water or use heavy baits like lobworms. They generally take around two to four swan shot, and a simple shotting pattern of all the shot load about a foot or two from the hook usually suffices. Balsa floats are usually built on more delicate lines to chubbers and range from small ones taking as little as 3BB to ones that overlap the chubber range. Ones with fine tips allow more delicate fishing.
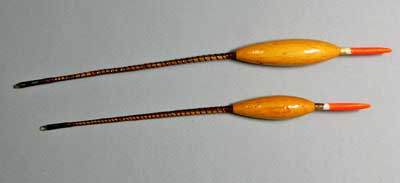
 For more delicate fishing still, the crow quill Avon (pictured right) is best of all. These delicate floats have an elongated rugby ball shaped balsa body with a crow quill stem. They range from 4BB to 12BB.
There are several factors when choosing a float for trotting; these are the depth being fished, the speed of the current, the casting distance, whether you need to get the bait down quickly through nuisance fish and finally whether other influences like strong winds need to be considered. If you work on the basis of being able to cast around twenty yards, and needing some weight to beat the current and wind, then working on the basis of one AAA per foot of depth for chubbers, one BB per foot of depth for crow quill Avons and one no. 1 per foot of depth for balsas gives you have a starting point.
 Attaching the float
These floats are usually attached with at least two float rubbers; one at the tip, and a longer one at the base. Crow quill Avons benefit from an extra float rubber just below the body of the float.
Get the line to float
Spray your reel line with a proprietary line floatant and ‘mending’ the line will be much easier.
Basic shotting patterns
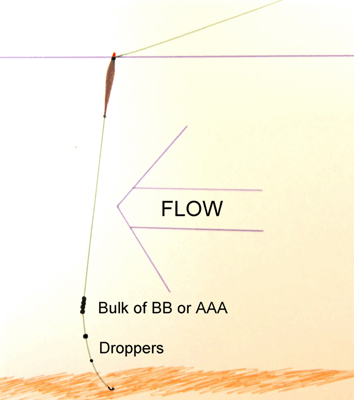
The simplest shotting pattern for a trotting float is to bulk most of the shot load about two to three feet from the hook with some smaller shot as droppers between the bulk and hook. You can taper this so that you have a mini bulk of say two no. 4 a foot below the main bulk with a no. 6 or 8 a foot below this. As an alternative to a bulk of shot it is possible to use a large olivette weight instead.
Plumbing the depth
There are several techniques for plumbing the depth; the simplest is to attach a tradition cork insert plummet to the hook and adjust the depth until you are sure you have the correct depth. Because the flow of the river will lift the hook bait it is usually worth setting the float slightly over-depth. Experiment to get the depth just right.
Variations whilst fishing
There are several variations worth trying whilst fishing; changing the depth is the most obvious, but it can also be worth changing the shotting pattern to alter the presentation. To do this try moving the bulk or change the dropper shots to be smaller shot; no. 10 for no. 8 for instance or by spacing out the dropper shot differently. Sometimes you may even need to change the float for a bigger or smaller pattern or one with a more sensitive (i.e. thinner) tip. Try retarding the float more; if it tends to rise out of the water then trying adding a small shot to the bulk so that the float is ‘over-shotted’ i.e. it would sink if not held up by the line pressure. This can be effective in powerful flows.
More Float Rigs
About the Rigs Page
- The Rigs Page is a library of features to illustrate all those rigs that will be useful to both beginners and experienced anglers.
- The rigs can be extremely simple and well known, or very complicated and little known, it doesn’t matter providing they make some kind of sense and have a really practical application.
- It could be a standard running leger rig that a beginner will appreciate seeing in pictures, or a very complicated anti-eject carp rig that the experienced carp angler would like to see.
- If you wish to contribute a rig to this section please remember that the emphasis is on illustration rather than words. Good line drawings are fine in the absence of photographs. Please send to graham@fishingmagic.com


