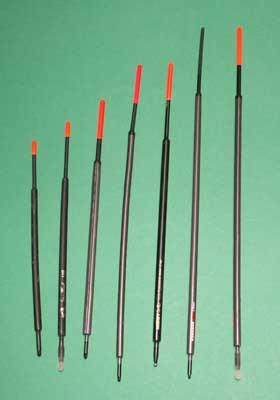
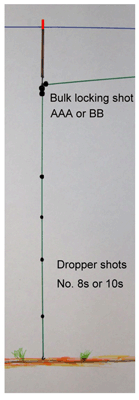
The simplest stillwater floatfishing method is to use a waggler float. The waggler, so called because it ‘waggled through the air’ is usually a slim length of peacock quill that is attached by the bottom end only. Use the main shot load to fix the float in place and give the float casting weight with about 75% of the total load used in this position. Split the remainder of the shot load into small shot such as size 8 and place at intervals (typically a foot or two) down the line.
Choosing a float
 For stillwater fishing, wagglers with a thin insert which is more sensitive to bites are generally best. The size of float used depends on several factors; these include the distance you want to cast and the depth of water. A little float taking 2BB might be fine for fishing just past your rod tip in three feet of water but for fishing in ten feet of water twenty yards out you might need 2SSG. To beat drift a longer float helps sink the line deeper than a shorter float. Loaded floats cast better than unloaded ones though most anglers manage well enough with unloaded ones that are more versatile as you can put more weight down the line if required.
Attaching the float
At the bottom end, there is usually a cane or plastic peg. On to this, you push an adapter that has an eye or swivel to pass the line through. To shot up the float and fix the float in position it is usual to place a large shot either side of the eye of the float adapter. Leave a half inch gap between the large shot as this allows the float to ‘fold’ on the strike.
To sink or not to sink?
With a float attached bottom end only, you have the option of sinking the line between the end of the float and the rod tip. Sunk line impedes the strike but it also stops the line drifting with the wind so it is usual to sink it. With a sunk line, it may pay to strike to the side rather than upwards thus pulling the line through the water instead of out of it. To sink the line slightly overcast the fishing area, sink the rod tip below the surface and wind a couple of turns of the reel handle quickly to pull the line below the surface.
Basic shotting patterns below the float
The simplest shotting pattern for a waggler is to have small shot equally spaced down the line. These shot can be no. 8s, or if you want to catch fish on the drop then use no. 10s. Conversely, you may want to get the bait down to the bottom a bit quicker, especially in deep water or to get through nuisance tiddlers. To do this, a mini bulk of three or four no. 4 shot bulked about three feet from the hook with two or three no. 8s spread below the bulk is the simplest pattern. Shotted like this the waggler float will not cast so well as there are two concentrations of weight and it may pay to increase the size of the float and hence the shot around the base of the float. The advantage of the quick change adapter on the base of the float is now apparent.
 Plumbing the depth
There are several techniques for plumbing the depth; the simplest is to attach a tradition cork insert plummet to the hook and adjust the depth until you are sure you have the correct depth. When moving the locking shot you may have to open them slightly so that you can move them. An alternative is to take one of the locking shot, assuming you have more than two locking shot, and pinch it on the hook, and finally if you want to fish over depth one method is to clip a spring-loaded plummet onto the final dropper shot so that you know how much you are over depth.
Variations whilst fishing
There are several variations worth trying whilst fishing; changing the depth is the most obvious, but it can also be worth changing the shotting pattern so that the bait falls more slowly through the water. To do this either change the dropper shots to be smaller shot; no. 10 for no. 8 for instance or by spacing out the dropper shot. Sometimes you may even need to change the float for a bigger or smaller pattern or one with a more sensitive (i.e. thinner) insert.
About the Rigs Page
- The Rigs Page is a library of features to illustrate all those rigs that will be useful to both beginners and experienced anglers.
- The rigs can be extremely simple and well known, or very complicated and little known, it doesn’t matter providing they make some kind of sense and have a really practical application.
- It could be a standard running leger rig that a beginner will appreciate seeing in pictures, or a very complicated anti-eject carp rig that the experienced carp angler would like to see.
- If you wish to contribute a rig to this section please remember that the emphasis is on illustration rather than words. Good line drawings are fine in the absence of photographs. Please send to graham@fishingmagic.com


