Selecting a margin pole
IT WAS NEVER in question. What I wanted was a pole of around 8 metres so that I could reach out to some lily pads if I wished, so not necessarily always for the margins.
I also wanted one for the least cost possible because I have a long pole anyway and this would simply be to supplement it. There’s plenty about now around the 8 metre mark, but the one I selected was the Middy Hot Spot at 8 metres plus it came with a spare power top two section and a free extension to take it to 91/2 metres.
Looking around for best prices they seem to be sold as part of a Middy bundle offer and I spotted an advert for Cheshire Fishing and Guns of Tattenhall, just south of Chester (www.cheshirefishing.co.uk, tel. 01829 770041). They were offering it by post so after a quick call (very pleasant service) the deal was done and pole arrived the day after.
With all the bits and pieces came the bungs, elastics, bushes for the tips, and Stonfo connectors for the rigs. Whatever pole you choose don’t expect too much for a low price, you get very much what you pay for.
If you haven’t set up a pole before you will need a very fine hacksaw blade, a very sharp Stanley type knife, a pair of scissors, and a fine marker pen. You will also need a diamond eye threading wire that you can get from most tackle shops to feed the elastic through the pole, but this will always be required and should last years. After checking out the size of the bush supplied for the two piece power tip (the ‘Bully Boy’ tip) it seemed a little large for me. OK if you want to fit one to the new hollow core elastics, which the supplied bush was made for, but I don’t so I used a slightly smaller bush of my own instead.
With the power top 2 fitted it measures 9.4 metres and 18cms shorter with the lighter top 3 fitted, the extension is exactly 1.4 metres so the pole itself is pretty accurately measured, but they’re never usually exact. The weight is given as 540 grams at 8 metres where I found it to be 640 grams, 100 grams heavier! (The scales I use have been checked with the post office and they are accurate). All in, with the extension and power top fitted it weighs 977 grams, heavy, but that’s fine by me for the strength of pole it is.
Preparing the pole kits
You’ll find many of the magazines regularly feature instructions on how to elasticate a pole and usually they come with some very good photographs too. My difficulty has been holding the pieces and at the same time taking the pictures (I’m not a woman, I can’t multi-task!) and so you must excuse the odd use of paper clips here and there.
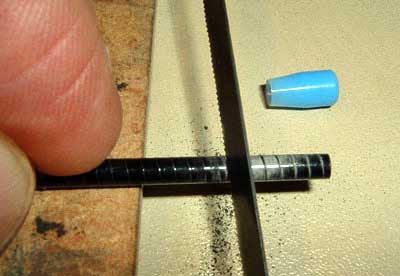
First job is to fit the bush, the small PTFE item with a hole through it, to the end of the topmost section. This is what allows the elastic to slide in and out smoothly. The bushes are mostly external fitting these days, though there are internal ones, but with these you have to cut even more of the pole away. So line up the bush alongside the pole so that the tapered end of the bush is just slightly larger than the diameter of the pole, this is where it has to fit over. If anything, err on the safe side by cutting where the pole may be slightly thinner. You can always cut off a bit more pole, but you can’t stick it back on again!
Take the very fine hacksaw and cut the pole section very delicately to obtain a clean cut! Try pushing the bush over the tip and it should, if you’ve judged it correctly, be slightly too big. This being the case cut a further 1 cm (1/2 inch) or more, if you feel it’s that far out, off the pole, but a little at a time is the rule. You might have to make 4 or 5 cuts before you get it absolutely right, but the bush should fit tightly with a little force to push it on fully.
Once it’s pushed on and a tight fit, that’s the job done. Some people apply a very tiny amount of super glue to set it, I have never done this as super glue doesn’t like PTFE, much better to go for a tight fit. The bush won’t go anywhere unless it’s too slack in which case you need to cut a little more off the tip.
Next job is to cut the bung so it will fit inside the bottommost section of the top kit (either top 3 or power top 2). Just like to make one point here that if you want to fish with the elastic going through a further section (known as the fourth section) then you’ll need another 4th section as only one is supplied and you can’t then share it with the two different tops. I thought as the kits supplied are almost 3 metres long, that should be enough elastic. We’ll see, but you can always order another 4th section later if you want one.
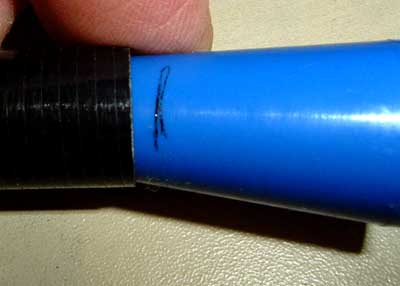
Offer the bung into the bottom of the pole kit so that it’s tight and mark the edge of the pole with a permanent marker pen onto the bung. Take the sharp Stanley knife and cut (be very careful as these bungs can slip) around the bung.
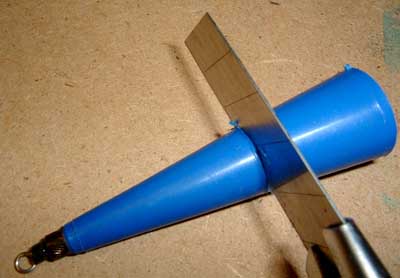
Try fitting the new smaller bung inside the pole (with the Hot Spot you get a special rod to grip the bung so you can push it in and extract it), it should go up into the pole by a good 6″ (150 mms) to allow the section of pole below to fit in also. If it won’t go up that far, even with a good firm push, just trim a very small amount more, tiny slivers, off the bung until it does.
Elastication
For this you need the diamond eye wire and push an inch or so of the elastic through the eye and up to the top end so that the elastic is trapped. Push the other end of the wire down through the bush and topmost part of the end kit, pull through and when the diamond end of the wire wants to bring the elastic through the bush just pull harder on the wire. You might want to tie a paper clip the to far end of the elastic to ensure it doesn’t also come through the bush otherwise you’ll have to do it all over again. If this is the three part kit, go through the next section also and fit the two sections together, it’s unlikely you’ll want to take them apart after.
Now pass the wire through the bottommost part of the kit and fit that section to the other so now you see the top kit in full. Pull through until you get the elastic, which should run straight through the full kit. Now you should attach the elastic to the bung.
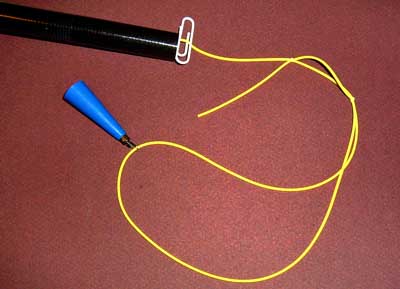
One thing I like to do with the elastic is to double over the last 12 inches or so at the bung end (see picture) and secure with two simple overhand knots 1-2 inches apart. As well as being a shock absorber the elastic provides the resistance and having a short length doubled over increases that resistance. When playing a fish the single elastic will stretch more than the doubled elastic at first until at one point the double elastic will kick-in and strengthen the resistance. In use it appears seamless and you wouldn’t notice it at all.
I did a little test. The length of elastic was 36″ overall, but 12″ of it was doubled and the whole thing fixed to a rigid point with a simple spring balance at the other end. I stretched it to 4 times its length (ie: 3 ft + 9 ft) and it was remarkable how the force of resistance climbs disproportionately the more it is stretched.
This is not an accurate or scientific test, but it is reassuring to know that this elastic, a number 10, when stretched to four times its normal length, gives the same amount of resistance as a 21/2 lbs TC carp rod (ie: 40 ounces) and there was still some stretch left in it. However, my point from all this is, when you think that your single elastic is about to ‘bottom out’ there’s always a bit left in reserve where it’s been doubled-up.
Once the bung is fitted to the elastic you can insert the bung well up into the pole, make sure you can get the next section into the bottom and if not push the bung up further. Now, back up to the tip end and you need one of the Stonfo connectors. Take the Stonfo cap and push that onto the elastic first followed by the connector portion through the small hole in its side. Being careful not to let the elastic go back into the pole (I’ve done it) you need to put some tension on the elastic before tying on the Stonfo with a single overhand knot pulled tightly against it.
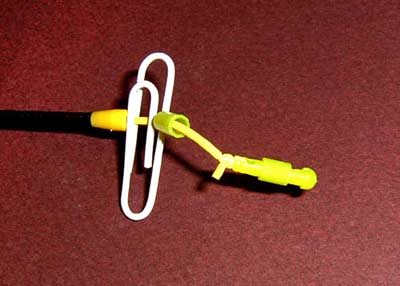
The amount of tension is up to you and it’s to ensure that when you’ve had a fish on, the elastic always pulls back into the pole. It’s not easy to judge precisely how much tension because too much and the elastic can go zooming back in and might even damage the connector or bush. I judge it by pulling the elastic just enough so that it straightens out, but no tension, then pull out a further 6-12 inches until I feel there is about 4 ounces or so of pull on it. You can sometimes readjust it later by re-tying the Stonfo on again or you can buy bungs with a tensioner designed in.
Storing the kits
You can now tackle the other top kit and when they’re finished you can store them in the extension section of the Hot Spot, with other poles you may have to buy a separate tube.
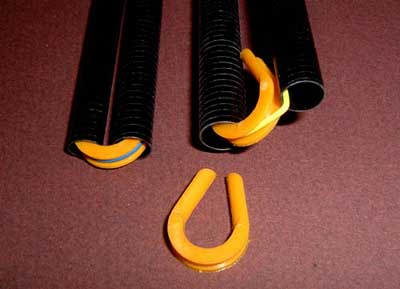
The three part kit can be separated, leaving the top two together and just the bottom section doubled over. When you’re in the tackle shop one day you might want buy some horseshoe shaped ‘Doobreys’ as they protect the elastic from the sharp carbon edges. Lap the elastic around them and tuck each leg down the kit sections.
Well, that’s it, job done.
Next – Fishing with the pole, setting up float rigs and storing them


