I’ve had a number of enquiries about how I go about setting up my adjustable Zig Rig, following on from the mention of it in a previous piece. I also do a number of fishery roadshows as part of my consultant duties for Nash Tackle and the setting up of zigs and adjustable Zig Rigs is one of the topics most often asked about.
Zig Rig fishing is most definitely becoming more popular and is a proven method for catching carp of all sizes, including some of the very biggest carp around. Therefore, with early spring being a particularly effective time of year for zig fishing, I thought I’d put something together in addition to my usual monthly diary giving you more detail and clarity around how I go about setting up and using my version of the adjustable Zig Rig
 At the roadshows I usually begin by explaining that if you can set up and use a marker float set up, then you can easily understand the set up and mechanics of an adjustable Zig Rig, as they work in exactly the same way. In fact the adjustable zig set up that I use is (in a way) a marker float type set up, with a 3ft zig hook length attached to the top end of the float! All of the components that I use in my basic set up are Nash items and can all be obtained from any of the tackle shops or online stores that stock Nash terminal tackle. Obviously there’s other gear around that does a similar job, but it’s the Nash kit that I use, so that’s what I’ll describe and illustrate.
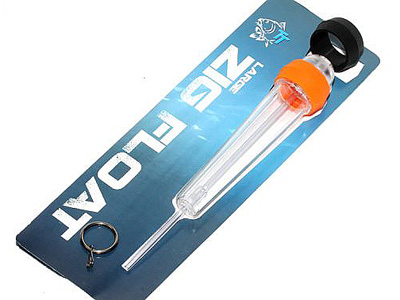
The Nash Zig Float comes in two different sizes, and it’s the smaller one of the two that I use 99% of the time. The floats come in a pack along with the low resistance lead clip arrangement and two different coloured rubber collars (one black and one orange) that can be slipped over the body of the float to act as a visual aid whenever you need to pop the float right up to the surface for reference. As I very rarely do this I usually just fit the matt black collar onto the float, as it’s less likely to spook any fish when the float is suspended somewhere in the water column, but it still acts as a visual aid to spotting the float if for any reason I do want to let it rise up to the surface.
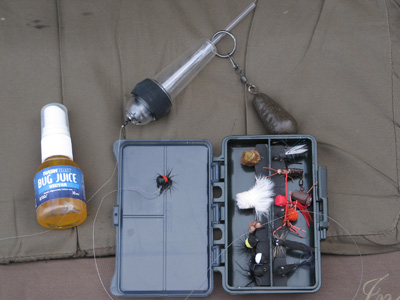
The float pack has an illustration on how to set it up inside the packaging and the photo of my standard set-up here should hopefully make things pretty much self-explanatory.
When setting it up from scratch, the lead arrangement with the quick-clip on the ring goes on the main line first, then the inline float is threaded up the main line, stem first, so that once it has been threaded and a standard-sized swivel tied to the end of the line, the float can be pulled down to the swivel, which pulls lightly into the little rubber recess in the top of the float and stops it falling off the end.
 The hook length is then tied to the swivel and, with a suitably-sized lead attached to the quick-clip on the metal ring, you’re ready to go!
For my adjustable Zig Rig I always make my hook length 3ft long, and this is for two very good reasons:
Firstly, it’s a nice comfortable length for casting, but still long enough to keep the hook bait far enough away from the float when everything is cast out and settled to hopefully keep the suspicions of a cautious carp to a minimum.
Secondly, it’s easy to work out the length that’s needed without the need of a measuring tape/ruler and will help when adjusting the zig to different depth settings… more of which in a moment.
As it’s proven to be very reliable over a couple of years of testing, I use the Nash NXT Zig Flo line for my zig hook lengths, usually in the 10lb version. I achieve a consistent 3ft length without the need to measure it by first of all tying on my chosen zig hook bait to the end of the spool of Zig Flo, then taking the spool up to my made up rod and holding the zig hookbait at the end of the butt and pulling the line off the spool in a nice straight, line up to the join of the top and bottom sections of the rod.
This gives me a 6ft length of Zig Flo line from hookbait to spool (assuming that I’m using my usual 12ft rods). Keeping the line trapped at the spool, all I do then is fold this length of line in half and then allow an extra inch or two for the final knot and cut at this point.
 This results in a hook length of 3ft (with a little extra inch or two) with my hook bait tied to one end and a loose end, which is subsequently tied to the swivel on the end of my main line, which locates into the top of the float. So I always end up with a consistent 3ft hook length every time.
People get concerned about tangles with Zig Rigs, but setting up the adjustable zig with a manageable 3ft hook length and controlled casting and setting/adjusting of the end tackle should result in very few problems. When launching out the rig I try to overcast with a smooth action, feathering the end of the cast and then stopping the cast just before the lead hits the water so that the hook bait is flicked out and the hook link is nice and straight. I also like to keep a relatively tight line on things as the leads sinks, which means that the end tackle will swing in slightly and keep the hook link away from the rest of the tackle and main line as it all descends to the lakebed.
With the cast complete and everything settled, with the main line tight to the end tackle, it will mean that the zig float is pulled down tight to the low resistance lead ring, with the buoyant hook bait floating 3ft above the float. Even if I want to fish the hookbait much higher up than that I usually leave things set like that for the first few minutes after a cast, just in case the fish are lower down than I think. Part of the real benefit of the adjustable zig is that you can really search the water column, rather than fish a static bait in one spot on each cast.
To adjust the rig to fish higher up in the water, all you have to do is pull some main line off the spool of the reel and let the float pull the slack line up as it rises up in the water.
Obviously the buoyant hook bait makes the same amount of movement upwards as well, so is now fishing higher up from the lakebed.
When I make these adjustments I like to do it all very slowly and also keep a mental track of the amount of line I’ve released from the spool, so that I always have a good idea of the depth that I’m fishing. In this way, if I catch I know the depth at which I was fishing when it produced the bite, so I can quickly get the bait back out and adjusted to fish the same depth on the recast.
When making the actual adjustments I always do it slowly, and rather than allowing the float to shoot upwards like a Polaris missile I just inch it up a bit at a time. So if I’m making, say, a 3ft adjustment, it might take several minutes to complete. This helps to ensure that the hook link, which is not as buoyant as the float and will therefore rise more slowly, doesn’t tangle around the main line behind the float. It also means that I slowly explore different depths with the hook bait. I can easily imagine a carp taking notice of the bait and being tempted to suck it in as it slowly creeps upwards in front of its face.
Once you’ve explored different depth settings with the zig without any action, you can explore another spot in the swim in the same way by simply reeling everything in a few yards and starting the height adjustment sequence over again.
Zig fishing can be a very proactive approach if you want it to be and I find it adds an extra element of interest and excitement to what could be otherwise a relatively static session. This year I’ve even found myself taking along an extra rod set up with a Zig Rig in an attempt to catch a bonus winter carp on my gravel pit piking sessions!


